Honey face wash

This is a bit more of an in depth explanation of using honey to wash your face with.  I wrote about my whole face care routine here but I didn’t explain in detail the hows and whys I do a honey wash. I usually use the oil cleansing method at night and honey in the morning.

Honey is an amazing thing. Especially if you get the good kind…which would be organic, raw, unpasteurized, unheated, local honey. It isn’t as hard to find as you think. Just make sure it says raw not pure….pure means nothing! Of course its pure…all it is is honey!

Here is why I think honey is so amazing!

  1. It helps to heal and repair scars
  2. It literally never goes bad
  3. It is antibacterial and antimicrobial…naturally, thank you bees!
  4. Its an anti irritant…so its great for any skin type (unless you have an allergy)
  5. Its full of enzymes, antioxidants, vitamins and minerals
  6. It tastes amazing
  7. It helps you to sleep at night (when taken with a fat source…see here for more info)

WASHING YOUR FACE WITH HONEY

Its an easy step to add into your routine or to make your only routine.

You will only need two things.

  • Facecloth
  • Jar of raw honey

Steps

  1. Start with a dry face…no make up, hair tied back. If you have make up on, I will add a note on the end.
  2. scoop or pour about a rounded 1/2 tsp of honey onto your fingertips
  3. massage between fingers for a few seconds then apply and massage all over face.
  4. if it is really sticky and you cannot move it around (my honey is crystallizing so this is me) wet one finger….seriously, only one. Share the water between one on your other hand and continue to massage on your face.
  5. OPTIONAL…let sit for up to 5 minutes
  6. Rinse with cool water. A few splashes will usually do.
  7. I use a facecloth with cool water at the end just to make sure I got all the bit by my nose and hair line.
  8. I follow it up with a spritz or two of witch hazel
  9. Use your moisturizer if needed. I usually use my face oil and if really dry, a bit of coconut oil.

20140109-215422.jpg

Natural Vapo Rub

This year, my family has been hit with a bad case of congestion. Coughs and stuffy noses all around. We were lucky that we try and keep healthy by eating good, taking our vitamins and probiotics and getting to our chiropractor (who is amazing!). I had a small leftover container of baby vapo rub from a while ago that someone had bought be as a baby gift, and used it up the first night on my daughter. After that, I was on my own. Since I easily make my own body butter, I figured it would be easy to make a vapo rub version, and it was. For this one, I didn’t use my food processor because I didn’t want essential oils in it(especially eucalyptus)

Natural Vapo Rub

enough coconut oil to fill a small jelly sized mason jar
mason jar – jelly sized
4 drops eucalyptus essential oil
1 drop tea tree essential oil
*OPT lavender essential oil, rosemary essential oil

In a bowl mix coconut oil and oils with a metal spoon. I use the back of the spoon to smash everything together until it was soft and smooshy. Put it in your jar and label with the date. I am not sure how long it would last but we went through the jar in two months so it wasn’t an issue.

I didn’t want to make this too strong because it was for my 4 year old, so if you are making it for an adult, you could probably add a bit more, but you also don’t want it too overpowering.

Please note that since I was slathering it on her, I made sure she was in old pj’s we didn’t care got oily. I know there are versions that use shea butter and beeswax but I didn’t have either of those so I improvised. Those versions may be less oily.

Coconut oil body butter…that stays soft!

Whipped coconut oil. Sounds good enough to eat, and you could if you really wanted to!

I live in Alberta, Canada where the winters can get very dry and cold. I need a good lotion to combat this so my skin doesn’t feel like I want to rip it off. Since I already buy coconut oil in copious amounts, I have always used it for my families skin care. What I do not like about it is when it gets super hard in the cold main floor bathroom when it is -35! So, I read on Chagrin Valley’s page about their whipped body butter and body balms and I wanted to try them but couldn’t afford the shipping. So, I made my own more simple version with what I had on hand.

Body Butter/Whipped coconut oil

coconut oil
*OPT essential oils

I use the wide, short mason jars to store this but you can use whatever leftover jars you want(old body shop body butter ones work great). Use a bit less coconut oil then the containers can handle.
Put the coconut oil and essential oils(only a few drops) in to your food processor and pulse until is softens a bit. Then let er’ rip. Keep blending until it is fluffy.
Scoop whipped oil into containers.

For some reason it doesn’t get solid…usually. I did bring mine into the shower with me once because I like to soak and seal(put lotion on while damp then pat dry), and it melted a bit with the steam and was a bit more solid again. So…keep away from registers or heat sorces to keep fluffy.

Flawless face care routine

….well almost flawless skin. Hormones and diet can play a huge role but good base skin care really helps!

I’ve posted before about the oil cleansing method for cleaning your face. I won’t talk too much about that now but I do want to share what I am doing to help keep my skin healthy as well as toxin free. Really good skin comes from several things. Diet, hydration, climate and skin care. Now my diet is really good, most of the time and I drink a ton of mineralized water. We live in, at the moment, a very cold and dry climate here near the Rocky Mountains of Alberta. I keep humidifiers running in my bedroom and my daughters 24/7 and do not keep our heat too high. Still, incredibly dry. So it all comes down to skin care.

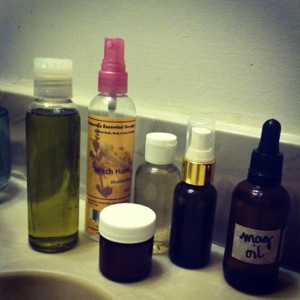
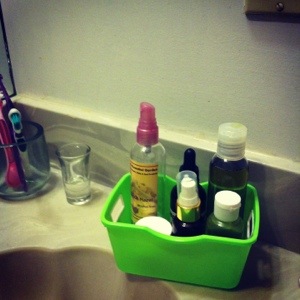
Here are my supplies all kept in a small bin with small bottles because I have a small ensuite bathroom. This is just my bedtime routine. I will follow with my morning routine.

20140109-212643.jpg
And yes that is a shot glass in the background with mct oil for reducing the wax buildup in my daughters ears.

20140109-213151.jpg

So in those bottles are

  • My face wash oil
  • Witchazel (pure no alcohol)
  • Castor oil
  • Face oil (I will post about how I make that soon)
  • Magnesium spray (not for face but part of my bedtime routine)
  • And front short one is coconut oil

Here is what I do.

  1. If I have actually worn any eye makeup(about once a month!) I use a cotton pad or old scrap piece of cloth to dip in the coconut oil and wipe my eyes. All traces are as good as gone.
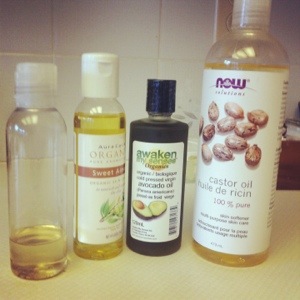
  2. Wash face with oil cleansing method. See how to here. My new oil blend is 1/3 castor oil, 1/3 sweet almond oil and 1/3 avocado oil. It’s wonderful.
  3. Spritz the witchazel all over my face and neck. Pat in with my fingers.
  4. Share a drop or two of castor oil for under and around the outsides of my eyes. It’s very thick so please don’t rub, dab with your ring finger.
  5. I always follow with my homemade face oil. I use two pumps for face and neck and gently rub in.
  6. Lastly I use coconut oil on my eyebrows because they tend to get very flaky and dry during the winter. I also use it to ‘paint’ my eyelashes. This really helps keep them strong and grow well.

It sounds like a ton but the oil cleansing is what takes some time. The whole routine takes about 5 minutes or less. I do like to steam my face a bit extra in the winter.

As for my morning routine, it is super easy and simple because I need to be ready for the day in as little time as possible. (here is my full explanation)

I only need four things.
Facecloth
Jar of raw honey
Witchazel
Face oil

20140109-215422.jpg

On a dry face, slowly work in a little scoop (maybe rounded 1/2 tsp) of honey. Yes…this sounds crazy and it is very sticky but it is super great. If it is super thick like mine, wet one finger to massage into your skin…not much otherwise it wont rub on well(you’ll just be washing it away). Honey is very healing and has amazing antibacterial properties. I use it to help keep the occasional pimple away. I rinse my face with cool water, it only takes a few handfuls splashed onto my face then use a cool facecloth and gently wipe any last traces away. Spritz on some witchazel, pat in. Two pumps of oil and I’m good to go.

Shampoo bars

So, it’s been a long while since I have posted anything and I feel like an update is needed in my shampoo or no-poo quest. I live in a city with very, very hard water and of course we cannot afford a water softener. Now, we have bought shower head filter and it should be noted that we do not have fluoride in our water, thank god! The shower filters have really helped but for those of us with hard water, making your shampoo system work isn’t easy. Especially us girls who have finicky longer hair.

Ok…so I’ll recap. For the last year or so I’ve experimented with baking soda wash and vinegar rinse, more natural actual shampoos(like dessert essence), edible shampoo solutions(egg washes, avocado, banana, oatmeal …etc), not washing with anything but a washcloth and water, washing with honey and herb water….the list really could go on! My poor hubby…he has put up with a lot and probably thinks I’m mildly crazy.

At one point I must have affected the betters half’s subconscious (or he was tired if me experimenting and smelling like vinegar!)because he stumbled onto a YouTube link that a girl was reviewing shampoo bars from chagrin valley. He made me watch it and I was intrigued. I researched their company, products and methods and was impressed with what I saw. Then I looked into the cost of shipping to Canada…yikes! I figured it was with it if I bought enough so I ordered about 10 sample bars and 3 big ones.

Once they arrived I was eager to try them! At first even my hair took some time to adapt to the bars. It seemed to leave a film on my hair. After traveling with the bars all over I’ve come to the conclusion that it is mostly our water. It’s terribly minerally and drying. The other factor is hormones. My husband doesn’t seem to notice as much as me because his hair is so short. Although what he has noticed is that his thinking hair isn’t thinning and is much darker now. It also is more manageable. He is using a bar recommended for those with hair loss to stimulate the scalp. I have tried many of the bars. I will lay out my evaluations on my own hair at the end. However, on my three year old, who does not have the hormones that I do, and every bar makes her hair look beautiful and shiny and soft. She also can get away with only washing one day a week. Me, I need at least two. If I were not working at home I’d probably have to add another wash in there to adhere to conventional “beauty” standards…day 4 hairs gets a bit unruly! I have gone 4-6 days when traveling to a place with soft water. Im always sad when I get home and go back to my hard water.

So…long rambling post, I know…here are my conclusions.

**post not complete** … I will update…I promise! Problem is, when washing your hair only two times a week….its hard to get all the results.

Oil cleansing method

Washing your face with oil sounds a bit kookie…but it really works! It works better than most make-up removers and it helps to remove all those blackheads and whiteheads you can never seem to get rid of.

Basically it is what it sounds like. Washing using oil. The method is very relaxing (as long as you don’t have a child screaming about what pajamas to wear to bed in the background). Knowing that oil dissolves oil is very important in this process. Basically, you are using good oil to dissolve and wipe away all the dirty oil from your face, then replenish with more oil. No chemical involved at all to strip your face and make it feel tight. On that note, your face may feel tight if you have hard water or high chlorine in your water. I use our shower head filter to run the water to wash my face for better results, or you could boil water…but that takes time!

So, you need only a few things. Castor oil, a moisturizing oil, a facecloth and a hand towel.

Good oils for all skin types include:

  • sweet almond
  • jojoba
  • grapeseed
  • olive
  • argan (expensive)
  • sunflower seed

Good oils for other skin types are:

  • avocado – dry or aging
  • apricot kernal- dry aging

A few things to note. Castor oil can be very drying so make small batches to start in case you need to change your oil ratios. Also, remember that the time of year and your climate may also dictate you needs.

There are many basic ratios you can follow, the important thing to note is all of them have normal skin with a 1:1 ratio.

Oily skin – 2/3 castor oil, 1/3 carrier oil (2 tsp castor, 1 tsp carrier)

Normal skin – equal amounts of oils

Dry skin – 1/3 castor oil, 2/3 carrier oil

The “how to” part.

  1. Premix your oils in something (I use the original sweet almond oil container). Turn on your water to very warm. Warm your facecloth under the tap until needed.
  2. Rinse your face with warm water then use about a quarter sized amount of oil and gently massage it all over face. Work it into the blackheads and all the little areas. Massage always in upwards circular motions to get it into the pores. Do this for about 2 minutes then let the oil sit for about 30 sec.
  3. Heat your wash cloth until almost too hot for your face. Lay the facecloth over your face, cover with hand towel and relax until it cools…about 30 seconds-2 minutes. Gently begin to wipe off the oil. Rinse your cloth, really well.
  4. Repeat step 3 one to two more times but wiping face with hand towel so you don’t rub with the oily cloth.
  5. OPTIONAL: If you need a bit of moisturizing you can dab a bit of your oil mixture on to the areas. Just be careful not to add too much or it wont absorb in or refer here for my face oil recipe

Coconut oil is not recommended for use on face for everyone…it does clog pores and may contribute to blackheads. I use coconut oil on my eyelids and under eyes. It is really great for wiping away mascara and eye make up before washing your face.

That’s basically it. It can take your face a week or so to adjust to the new way of washing…as in not over producing oils, like in your hair!

Thanks to crunchy betty and oil cleansing method for information.

Troubleshooting:

  • make sure you are steaming your face and cleaning the dirty oil off well.
  • try a different oil ratio
  • try a different oil
  • If just beginning the ocm, you could mix just small amounts in your hand to see what ratio was best for you


UPDATE

My new oil blend is 1/3 castor oil, 1/3 sweet almond oil and 1/3 avocado oil. It’s wonderful. Basically, just pour into a container and shake. Away you go!


20140123-214402.jpg

Homemade Toothpaste

So, toothpaste was the first thing that I actually made from scratch in my adventure into the uncommon! I made two batches one that I liked and one with more sweetener and peppermint that my husband was supposed to like more! Alas, he didn’t so he kept on with his crunchy, clay based toothpaste. He said my version didn’t make his mouth feel fresh…I don’t know what he is talking about. I think that he just didn’t want to brush his teeth with oil.

In my journey and research, the reason I decided to make my own paste is because of one ingredient…well two. One is triclocan. We have all heard that it is not a good thing for our bodies and like most of our foaming hand soap from my favorite bath and body place, everything has triclocan in it! Why toothpaste? I think because of the anti-gingivitis effect it has. However its safety is currently under review both by the FDA and Health Canada. It is easier to find toothpaste without it. Glycerin, however, is in all regular toothpaste and almost all crunchy, green versions too! We did find one for my hubby that isn’t and he loves it. So, why is glycerin so bad? Well, the problem is that it will coat your teeth and prevent saliva from interacting with your teeth like it is supposed to. During sleep, our bodies are supposed to heal and correct damage done during the day. Since our teeth are coated with glycerin, our body cannot re-mineralize or re-enamel our teeth. Yes…our body can actually re-enamel our teeth if there is no coating. The trick is that it takes about 20-30 brushes to get rid of all the glycerin buildup on our teeth. So, make sure that you are brushing well and flossing. It is very important to floss.

So, here is the first recipe, adapted from here.

  • 8 tbsp non-aluminum baking soda
  • 4 tbsp organic coconut oil (warm it to make it liquid)
  • 10 tsp xylitol  (just put in coffee grinder to powder the crystals)
  • 2 tsp peppermint oil …baking kind
  • jar

Mix it all up and store it in the bathroom. I have a little ice cream spoon I keep with it to scoop. This is a very abrasive toothpaste that will last a very long time. I have used it for 5 months and we are not even half way through it! I would suggest halving the recipe to try it out.  Now the version for my hubby…which I actually like better now, has more peppermint oil and more sweetener. Basically, do those two to taste. I am also thinking of changing the recipe eventually for my daughter to use. Right now she has an amazing toothpaste with xylitol and I am not sure I can compete with strawberry banana flavour at the moment!

My new recipe will be:

  • 2-3 tbsp coconut oil
  • 1-2 tbsp xylitol, again make into powder
  • oil (be it peppermint, or other flavor for the little one.)

This one will be not so abrasive to the teeth, which will be good now that all the glycerin is off them. It will also be better for kids and the amounts vary depending on how sweet you want it. When I need my teeth to feel extra clean and whiten them, I will go back to the baking soda one…usually following a hydrogen peroxide rinse.

For the hydrogen peroxide rinse…you shouldn’t be doing this all the time…but it will whiten teeth and help remove canker sores. I use about 1 tbsp worth and swish for 20 seconds. Make sure not to swallow it…obviously! Then rinse out your mouth well with water, a few times. Continue on to brush as normal. I like to do the rinse first because it may work great, but sure doesn’t taste great. The toothpaste helps to get the taste out of your mouth!

No shampoo update

Ok…wednesday i dis the egg wash, then with beautiful hair i slathered it in coconut oil to combat dryness and test distilled water with BS. Thursdays BS wash and white vinegar rinse took care of all the coconut oil and left y hair great. Then yesterday, friday, my hair seemed to be getting greasy way too fast. By the afternoon it was a mess. I wonder if the egg shampoo actually works more like real shampoo in that is does a great job capture all the natural scalp oil? Don’t know…need to research that more. It didn’t help that I had two children playing hairdresser for half an hour! So this morning I considered doing another egg wash or a BS wash but then I knew that it I could hold out and just water wash my oils may regulate sooner…so tricky with our hard water. I also remember reading somewhere that one gal just rinsed with vinegar instead of washing…I figured I had 1/4c of my diluted vinegar from Thursday, I’ll give it a go. I have my hair a good scrub with my fingers the poured on the vinegar. I combed it through a few times then rinsed with as cold of water as I could stand. After drying my hair was not as bad but the front was still a bit greasy…more than I wanted to go out with for coffee and errands with others. So I sprinkled a bit of cornstarch at the roots near the front to try to combat the oil and I combed it out as best I could…I had to use my fingertips so my roots were not white! But in the end my hair looked and felt allow normal. Yeah! I will push this as far as I can before “washing” to try and just let my hair sort itself out. I hate my hair looking awful when I go out so we will see how long I go this time. I’m hoping each time gets better and better!

The shampoo couldn’t wait

So, this morning I woke up and my hair felt awful and a shower couldn’t wait till this afternoon. It felt like I put a handful of coconut oil in it…which I did! So, I was skeptical to say the least that the baking soda in distilled water, followed by a white vinegar rinse would get it out. To my happy surprise, it did. Something about it worked and my hair felt like normal…I mean normal as in I’ve used regular shampoo normal. It was light and fluffy and more shiny than before! YEAH. So … next test is to see if the boiled water works just as good!.

Egg Shampoo…update on ‘no poo’

Every time I write or see ‘no poo’…I hate the term a little more! It just annoys me that a whole movement could be called this. Whatever!

So today marks 3 1/2 weeks of not using traditional shampoo. See other post of more information. On the weekend I went and bought a boar bristle brush because I read that it helps some of us even out the oils. I have been finding the my scalp and roots are oily, waxing but the ends are dry. I have adjusted the baking soda, vinegar and still not much change. Still night and day better then when using real shampoo. So I set out to see what I could try.

First I tried the brushing. My hair felt amazing and it did help my ends but not the scalp and roots. So more reading. I stumbled onto some posts about hard water and how it is much more difficult to get it right. AHHH…no wonder I was having issues. Our water is super hard, especially in winter. There are many things I could try. First, I bought a chlorine and particle shower filter(wanted to do this anyways). Then for my next shower I tried using a 1/4 t of citric acid instead of vinegar as my rinse as it breaks up mineral deposits better. My hair was a bit better but not awesome.

Today I read here about an egg shampoo. I was intrigued. So, I decided to whip up some egg yolks and “wash” my hair. I was totally surprised! It actually worked. My hair felt amazing at the roots. It looked normal. So, what did I do? I tackled my ends. They probably need to be cut but I am cheap so I am waiting until my mom comes to visit on Sunday and get her to cut it for me…sorry hubby…don’t trust ya! My ends are still dry because my hair hasn’t been trimmed in over a year, yikes. So I slather on the coconut oil. It totally makes my ends greasy and stringy but I am not leaving the house today so who cares! My three year old just thinks my hair smells amazing and loves that it is super shiny. Why can’t we all think like that! I will leave this on to sink in as long as I can…hopefully tomorrow afternoon. Then I am going to try my next experiment.

I read somewhere that I should be using distilled water or boiling water and adding the BS while boiling, then waiting till it cools. I am not really interested in having to buy water just to wash my hair but since I already have distilled water at home to fill our humidor, I will give that a shot first. Then, I will try the boiling water to compare. Since I am only ‘washing’ twice a week this will take another week of experimenting, but I will post back to you!

I also read about combing it when vinegar is on in the shower to reduce the sebum but I still don’t have a comb, so maybe the next Saturday. I don’t want to combine doing two new things at once because then I don’t know what it was that helps my hair.

Here is the egg shampoo recipe:

  • 2 egg yolks
  • 2 tsp white vinegar (it cuts minerals better than ACV)

Mix together with a fork. Add a bit of water if needed to make it runny. Pour over scalp and ‘shampoo’ in. Let it sit for a minute or two to absorb oils. Rinse out with cool water very thoroughly. Don’t use warm or hot water or you will cook the egg into your hair.

Thanks to The Eco cat lady and to Babs where I got a lot of my information from.


UPDATE HERE