Live happy.

So I really haven’t had much time to post anything new or finally add my new recipes to the page. It’s been a whirlwind of a year and I am loving all the challenges my new job brings. I was inspired by a coworker to start posting again since I am passionate about sharing information and all the things I’ve learned on my journey to becoming healthier from the inside out. That said…watch for new recipe links and posts and some important updates on vitamins for adults and children. Life being …. well, life, I will get back in the habit of posting. I am working on spending more of my time doing what I feel is important. For me that is family, learning new things(really loving the research on interaction of vitamins with mechanisms and pathways of the brain and the whole idea of epogenetics…amazing!) and of course sharing information.

Live happy everyone.

“The reason people find it so hard to be happy is that they always find the past better than it was, the present worse than it is, and the future less resolved than it would be.”

Buying organic

It is hard to know what effects GMO foods have on us. There is no real long term studies. That said, there are enough studies to know that GMO foods and highly sprayed foods are probably not good for us! Eating on a budget and trying to be as healthy as possible eating little to no GM foods is tough since the price tag can be REALLY high! For ex. I usually buy apples, green granny smiths. A month ago, my bag of organic (so not GM) was $4.98 regular price at big box store (at little local market, same size bag, organic, but grown closer to home was $5.99). Last weekend…my apples…big box price $6.98 and local market, $9.99! Now, I know they are out of season…but seriously! wow!

Since we are under a tight budget at the moment…finally trying to pay off some debt and save for an actual vacation, I put together a list of what I am doing in order to cut costs overall, and specifically for buying produce.

As for the produce…here is my plan.

  1. Non-organic: broccoli, cabbage, cauliflower, brussels sprouts, avocado, garlic, plantains, bananas **WASH all very well in vinegar and water solution**
  2. Organic: carrots, sweet potato, kale, spinach, lettuce, leeks, zuc, summer squash, peppers, strawberries, any berry actually, apples, cucumbers **WASH these too…vinegar/water solution**
  3. Frozen: peas, broccoli, cauliflower, berries are usually cheaper frozen,
  4. What veggies I don’t use up for a meal, if I have no need for it, I will chop it up, bag and label it, freeze it for later use in soups.
  5. What friuts I do not use up before their time…I either chop and freeze for smoothies OR make applesauce with other friuts and freeze them. We do not keep much fruit in the house other than green apples, usually one type of berry and banana. (I consider plantains more a veg!)

Grocery shopping on a budget

So, the last few months I have noticed my grocery bill almost double! This is crazy because I literally buy almost the same things each week. I have been cutting corners and trying to find every little way to shop on a budget. Yikes…hard to do. I have come up with a list for you to help try and keep costs of buying healthy food down.

  1. PLAN YOUR MEALS…like for a month at a time…then
  2. Order grassfed meats locally and only buy what you need.
  3. Find a local source for your eggs. You may not save money because you will probably have a bit of a drive to get them, but they will be better quality.
  4. Talk to your local health food store about ordering things you always keep on hand in bulk. They may be able to help you out.
  5. Costco is good for some things…but watch out because it is tempting to over spend. Good things there…Mary’s best crackers, coconut flour, unsweetened coconut, wheat free oats, coconut oil, avocado oil and baking soda. I would love to see our Costco bring in BPA free cans of coconut milk…yeah, in my dreams!
  6. Grocery shop on a Thursday…I have NO CLUE why, but every time I shop on a Thursday, everything is in stock AND my bill is cheaper.
  7. Know what to buy organic and what you can pass on.
  8. Buy local is sometimes cheaper, sometimes not. Factor in the drive and your time! Remember too, just because it is at your local farmers market DOES NOT mean it is locally produced. At my farmers market they import the same organic peppers from mexico as superstore BUT charge double the price at the farmers market.
  9. Buying frozen isn’t always bad…if its on sale, organic AND frozen…do it! And stock up. Frozen is great for adding to soups.
  10. Make more soups. They are filling, esp with good fats from the ground beef or lamb, AND you can throw in as many veg as you want. They seem to last and last so it stretches your budget and can be frozen for later.
  11. Grow your own food. I am the worst gardener, ask my hubby! But I can grow kale, tomatoes, carrots, basil and mint all in pots in my yard. I make my own tomato sauce with the tomatoes and basil that I can and freeze for use during the year.


Kid Approved Green Smoothie

So, I have only had my Blendtec for a week and a half and I’ve already used it 45+ times! I am in love with it for almost everything…except making cauli mash. I didn’t think too smooth would be an issue but it gets it so smooth my husband and I cannot stand it. My daughter on the other hand LOVES how smooth it is. Great, now I have to make two versions for the freezer!!!

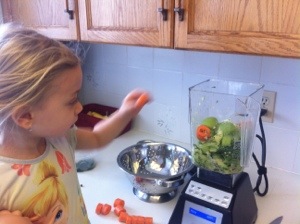
Anyways. I have been experimenting with whole food smoothies to get more veggies, fats and stuff into myself and my daughter. Usually I let the kids choose what fruits and veggies to put in but now we have moved onto experimenting on what colors of smoothie we can make. We have done red, orange, purple and now green. They have all been a hit. When you make things in a Blendtec, it makes a lot so either you need to share it between kids or with an adult. This recipe made 3 children portions or one child and one adult.

Green Smoothie…kid approved by all the slurping I hear

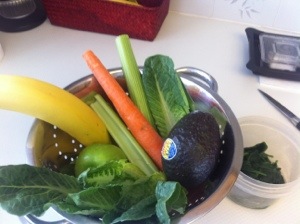
  • 4-6 organic romaine lettuce leaves, ripped up
  • a handful(adult) of blanched spinach
  • 1 organic carrot, chopped into chunks
  • 1 banana(this one was yellow but I try to use them more green for less sugar)
  • 2 stalks of organic celery, chopped into chunks
  • 1/2 avocado
  • 1/3 organic long english cucumber, chopped into chunks
  • 1 organic green apple, I use granny smith, cored and quartered
  • *1/4 tsp chlorella
  • * 2 tbsp grass fed butter or mct oil
  • *1-2 tbsp collagen protein

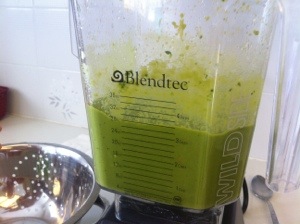
Wash and chop all veggies and fruit. Put them into your blender in order of softest to hardest. This makes it easier for blending. If adding in collagen wait until the smoothie is done to do a small blend in so you don’t destroy the protein. We have a “whole foods” button that you just press and watch it turn into a smooth shake. Make sure to consume it within 1/2 hr to get all the nutrients from it. It will stay good in the fridge for 24 hrs but it may loose some nutritional value…although I am no expert on this…just what I’ve read.

Enjoy!

20140306-095615.jpg

20140306-095627.jpg

20140306-095635.jpg

Kid Friendly Breakfast Alternatives

I have to say a huge thank you to The PaleoMom where I was able to get some amazing recipes. She has put a lot of work into her new book and her website is full of great, free recipes that can be adapted to be more “bulletproof.”

Some of the ones that I love to come back to are Plantain Pancakes and French Toast Bread. I will repost them below, but all credit goes to this awesome mama! The one recipe I cannot wait to try is the crepes…I make my crepes at the moment with potato starch but I know that isn’t great for you (unless you are consuming it raw as a resistant starch for probiotic gut purposes). My problem is finding green plantains…odd I know but when ever I go grocery shopping the plantains have almost always started to turn. BOO! Yum for caramelizing desserts but not for starchy breakfasts or refeed days.

My comments on the recipes are in italic bold…

Plaintain Pancakes

  • 2 large green plantains (about 2 cups pureed)
  • 4 eggs (instead I use 6 egg whites)
  • 2 tsp vanilla
  • 3 Tbsp extra virgin coconut oil
  • 1/8 tsp salt (a generous pinch)
  • ½ tsp baking soda
  • Extra coconut oil for frying …( I also use grass fed butter)
  1. Peel plantains (I find it easier to quarter them before I peel them) and place pieces in your blender or food processor.
  2. Add the rest of the ingredients to the blender or food processor and process until it forms a smooth batter (about 1-2 minutes).
  3. Heat 1 Tbsp of coconut oil in a fry pan over medium-high heat.  Pour batter into the frying pan until your pancake is the desired size. (I use medium heat and cook longer)
  4. Let cook 4-5 minutes on the first side, until the top looks fairly dry with little bubbles in it (just like regular pancakes!).
  5. Flip!  And cook on the second side for 1½-2minutes.
  6. Repeat with remaining batter, adding a little more coconut oil to your pan as needed.

French Toast Bread

  • 8 eggs, separated
  • ¼ cup Maple Syrup
  • 1 ½ Tbsp Ground Cinnamon
  • 1/3 cup full-fat Coconut Milk
  • 1/3 cup Arrowroot Flour
  • 1/3 cup Coconut Flour, sifted

1.    Preheat oven to 350F.  Line a 9”x13” baking dish with wax paper.  If helps to grease the wax paper with palm shortening, but isn’t completely necessary (I usually don’t bother). … (I do not use wax paper…instead I use parchment on the bottom and coconut oil rubbed along the sides of my corningware dish)
2.    Using a standing mixer, beat the egg whites until stiff peaks form (you can also do this with a hand mixer or even by hand if you prefer).
3.    In a small bowl, combine egg yolks, maple syrup, cinnamon, coconut milk, and arrowroot powder. (I omit the egg yolks so I don’t oxidize the fats…put them in your smoothie or something!)
4.    Gently pour the yolk mixture onto the egg whites.  Add about half of the sifted coconut flour.  Gently fold the mixtures together.  As they start to combine, add the rest of the sifted coconut flour.  Fold until fully combined.
5.    Pour batter into prepared baking dish and spread out evenly.  Dust with extra cinnamon, if desired.  Bake for 18 minutes, until golden brown and spongy to the touch.
6.    Very shortly after removing from the oven, lift the flat-bread out of the pan (using the sides of the wax paper, or just flip the whole thing over onto a cutting board).  Carefully peel the wax paper off the bottom.  Slice into squares and enjoy warm or refrigerate for later.

Dirty carrots

Everyone around here loves these carrots. They look not the most appealing but they taste amazing. As soon as I get some nice little carrots I will post a picture!

Dirty Carrots

  • 1/4 – 1/2 lb of small, organic carrots
  • 1 T oil (good olive, avocado or mct)
  • 1 1/2 tsp cocoa powder
  • 1 1/2 tsp coriander
  • 1/2 – 3/4 tsp cinnamon
  • few chili flakes or good cayenne powder (varies depending of tolerance of spice lvl)
  • pink salt

Preheat oven to 400. Throw the carrots on a pan with parchment and drizzle oil over carrots and coat well. Mix the spices together then sprinkle over carrots. Put them in the oven and turn heat down to 350. Roast until tender but crisp. 15-20 minutes.

Banana pancakes

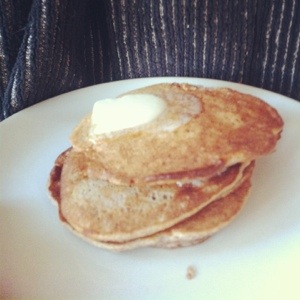
Today I took my recipe for my souffle, tweaked it and turned it into pancakes. It turned out great and everyone ate them…and not a spec of flour in them. Horray! They are a great way to get protein into your kids when all they want is a pancake.

Banana Pancakes

  • 2-3 bananas (today mine were on the green side as I just bought them, oh well…less sugar)
  • 4 pastured eggs, separated
  • 2 Tbsp butter (or coconut oil) **I would melt them to rm temp if not using a high powered blender like blendtec
  • pinch of vanilla bean powder (or a splash of vanilla)
  • dash or two of cinnamon
  • pinch of pink salt

In a large bowl, beat egg whites stiff. In processor, throw everything else in and pulse until smooth. Fold yolk mixture into the whites quite well. Fry up on a pan at medium heat. These take a bit longer than traditional pancakes. When you flip them, squish them a bit to even them out as they are very fluffy. Top with butter, maple syrup, berries, drizzle of raw honey or the best…coconut cream whip! YUM.


20140225-152555.jpg

Muffin Base (GF, DF, grain free)

I wanted to post a basic muffin base that I use to add chocolate chips, blueberries, raisins and a shredded carrot or whatever else your mind can come up with. I do not add nuts to my baking because I do not want to cook them. SO…these I use when I need a snack for my daughters school or need to take something to a brunch. I usually have a version of muffin in my freezer at any time to pull out for a snack in case I didn’t get to the grocery store and have a hungry preschooler who doesn’t want yet another egg!

Muffin Base (GF, DF, grain free)

  • 1/2 cup coconut flour, sifted
  • 1/4 tsp pink salt
  • 1/4 tsp baking soda
  • 4 lrg pastured eggs, room temp*very important if using coconut oil…so it doesn’t solidify**
  • 1/2 c maple syrup or honey(or other liquid sweetener of choice)
  • 1/2 – 1 Tbsp vanilla (depends on what you are adding as optional..blueberries add more, carrot add less)
  • 1/4-1/3 cup unsalted butter, melted (or coconut oil to make vegan)
  • 2-4 Tbsp coconut milk or water
  • OPT: 1/4 cup chocolate chips, 1/3 cup blueberries…etc. Really anything adding up to btwn 1/4 – 1/3 cup. **If you add frozen blueberries you will need less(or none) water.

Make 6-8 muffins. preheat 350

In food processor, blend all dry ingredients. Add in liquid ingredients. Blend until smooth. May need to scrape down the bowl. Stir in optional ingredients and fill each muffin liner with about 1/4 cup batter. Bake about 20 minutes or until toothpick comes clean. Once cooled fully, cover and store in fridge or freezer.

Note about butter or coconut oil. I like a more moist coconut flour muffin so I add more. If you like a drier version, add less.

This is my strawberry muffin. I’m experimenting with half the syrup and xylitol and soda water.

20140225-163936.jpg

Naniamo Bars (GF, DF, grain free, raw, vegan…yummy!!)

One thing that my mom always had in the freezer just in case anyone ever came over unespected and she needed a good dessert, was naniamo bars. Semi frozen and totally full of awful ingredients they were so delicious. I hadn’t had a naniamo bar in almost 2 or 3 years since going paleo/bulletproof. I found lots of great sounding recipes but they all used dairy or cooked the nuts. Both of which I do not want in my body. I remember seeing a version of raw naniamo bars on Pinterst but of course…like half of the time I find something…I forget to pin it because there is so much amazing and delicious things to look at! I did have a recipe pinned for a caramel raw vegan cheesecake, so that is where I got my inspiration. I needed help with the creme filling because the last thing I wanted was for my bars to taste like freakin’ coconut…again. I feel like sometimes every tastes like coconut!!! I used the base to a nut bar recipe I use and it seemed to work great.

Here is what I came up with. These bars do need to stay in the freezer but thaw out just right in about 1/2 hr on the counter. I have only made them twice and I do need to keep experimenting with my topping since it doesn’t like to cut in nice slices…its too cracky when semi frozen…still tastes delicious but annoying.

One last thing…When I made these, I did not have a high powered blender…actually, even our magic bullet was broken. I had to use the S blade on our 13 yr old food processor. It did the job, but not super silky smooth like the creme should be. I cannot wait to try it again this weekend with my new Blendtec!!! TY Costco for having it on sale!

Naniamo Bars (GF, DF, grain free, raw, vegan…yummy!!)

Base

  • 1 c slivered almonds
  • 1/2 c soaked mejool dates
  • 1/2 c unsweetened shredded coconut
  • 1/4 c coco powder
  • 1/8 tsp salt

Creme

  • 1/3 c coconut oil
  • 3/4 c soaked RAW cashews (soak on counter for 3-4 hrs)
  • 5 Tbsp raw honey
  • 1/3 cup coconut creme
  • 3/4 tsp vanilla

Topping

  • 1/2 c coconut oil
  • 1/4 cup cocoa powder
  • raw honey (to taste…depends on if you like sweet or bitter)

Line an 8×8 pan with parchment and grease the sides with coconut oil. Add all BASE ingredients into blender, processor, etc. pulse until smooth. Spread it evenly in the pan. Put the pan in the freezer. Clean and dry the blender.

Drain the cashew, saving a bit of the water. Add all CREME ingredients into blender and blend until smooth. Scrape down the sides a few times. If the creme is way too thick, add a bit of the cashew water. **Note on coconut creme. You can buy concentrate coconut cream in a can or just but a can of full fat coconut milk and put it in the fridge for 24 hrs. when you open it up be careful not to shake it at all and the creme will have separated from the coconut water. Try to look for a gum free, non BPA can of coconut milk. ** Ok…now that it is smooth and silky (or slightly clumpy as my first few attempts), spread it over the base layer and return pan to the freezer. Keep it in there for a couple hours.

Now that you base and creme are super chilled, time for the chocolate top. In a small saucepan, melt the coconut oil over med low heat. Whisk in honey when it has just melted and isn’t hot, just liquidy. Add the cocoa powder and whisk again. Pull out the pan from the freezer and pour over the chocolate topping. Spread quick cause it will start to solidify right away. Return to freezer overnight. Pull it out the next day and let it sit on the counter an hour before slicing it. I cut my whole pan up and wrap them individually in wax paper and put in a tupperware container in the freezer.

Hope you enjoy. They are worth the expense(cashews aren’t cheap!) and the wait!
Crepes (GF, DF, grain free, nut free, almost paleo)

I love crepes. I love using them for sweet breakfasts and savory suppers. They are pretty much once a month thing…until I went paleo/Bulletproof. I have tried SO many different recipes using only eggs, coconut flour, rice flour and even collagen. Nothing worked well or tasted half decent. We have come to realize that we (my family) are not that sensitive to nightshades and do not care about the occasional insulin burst from so much starch. These are a treat for us on a weekend.

Crepes (GF, DF, grain free, nut free, almost paleo)

  • 7 eggs
  • 1/3 + 2 TBSP potato starch
  • 1/2 cup + 2 TBSP water
  • imersion blender and large bowl

First, blend the eggs until they are frothy (30 sec). Add the starch and water. Blend again until smooth (45 sec). Ladle small amount onto a hot pan and swirl around. Cook until edges start to curl a bit then flip over. I use med heat and generally a smaller pan. Before each ladle stir the batter really well as the starch tends to settle.

I know this recipe isn’t close to being bulletproof…what can you do. I’m human. I eat better than most people I know.