Flawless face care routine

….well almost flawless skin. Hormones and diet can play a huge role but good base skin care really helps!

I’ve posted before about the oil cleansing method for cleaning your face. I won’t talk too much about that now but I do want to share what I am doing to help keep my skin healthy as well as toxin free. Really good skin comes from several things. Diet, hydration, climate and skin care. Now my diet is really good, most of the time and I drink a ton of mineralized water. We live in, at the moment, a very cold and dry climate here near the Rocky Mountains of Alberta. I keep humidifiers running in my bedroom and my daughters 24/7 and do not keep our heat too high. Still, incredibly dry. So it all comes down to skin care.

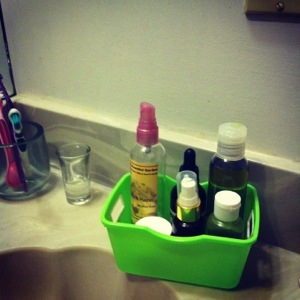
Here are my supplies all kept in a small bin with small bottles because I have a small ensuite bathroom. This is just my bedtime routine. I will follow with my morning routine.
20140109-212643.jpg
And yes that is a shot glass in the background with mct oil for reducing the wax buildup in my daughters ears.

20140109-213151.jpg

So in those bottles are

  • My face wash oil
  • Witchazel (pure no alcohol)
  • Castor oil
  • Face oil (I will post about how I make that soon)
  • Magnesium spray (not for face but part of my bedtime routine)
  • And front short one is coconut oil

Here is what I do.

  1. If I have actually worn any eye makeup(about once a month!) I use a cotton pad or old scrap piece of cloth to dip in the coconut oil and wipe my eyes. All traces are as good as gone.
  2. Wash face with oil cleansing method. See how to here. My new oil blend is 1/3 castor oil, 1/3 sweet almond oil and 1/3 avocado oil. It’s wonderful.
  3. Spritz the witchazel all over my face and neck. Pat in with my fingers.
  4. Share a drop or two of castor oil for under and around the outsides of my eyes. It’s very thick so please don’t rub, dab with your ring finger.
  5. I always follow with my homemade face oil. I use two pumps for face and neck and gently rub in.
  6. Lastly I use coconut oil on my eyebrows because they tend to get very flaky and dry during the winter. I also use it to ‘paint’ my eyelashes. This really helps keep them strong and grow well.

It sounds like a ton but the oil cleansing is what takes some time. The whole routine takes about 5 minutes or less. I do like to steam my face a bit extra in the winter.

As for my morning routine, it is super easy and simple because I need to be ready for the day in as little time as possible. (here is my full explanation)

I only need four things.
Facecloth
Jar of raw honey
Witchazel
Face oil

20140109-215422.jpg

On a dry face, slowly work in a little scoop (maybe rounded 1/2 tsp) of honey. Yes…this sounds crazy and it is very sticky but it is super great. If it is super thick like mine, wet one finger to massage into your skin…not much otherwise it wont rub on well(you’ll just be washing it away). Honey is very healing and has amazing antibacterial properties. I use it to help keep the occasional pimple away. I rinse my face with cool water, it only takes a few handfuls splashed onto my face then use a cool facecloth and gently wipe any last traces away. Spritz on some witchazel, pat in. Two pumps of oil and I’m good to go.

Making your own magnesium “oil”

Most of us have a magnesium deficiency whether we know it or not. We used to get our magnesium from our soil and water, however we have been depleting those, as well as other trace minerals, for a long time now. There are ways for us to get these very important trace elements back into our bodies so our systems can function the way they were intended…to heal themselves.

One way we can get magnesium is to take supplements. Magnesium glycinate is a very good form to take but also very expensive and not to mention another freakin’ pill to take! You can purchase various warm drinks such as Natural Calm which work well and can be very relaxing before bed (because they are warm). You can take daily baths in magnesium chloride flakes, however the amount needed for each bath would be outrageous on your budget…think $20+ a day!! And you can buy magnesium chloride spray but again…the expense is huge for the tiny amount. The cheapest and easiest way though is to make your own “oil” or spray. I have recently made my own and it was easy, made a ton and will be used for the whole family. It is also a much faster way to get magnesium into a 4 year old who sometimes doesn’t want to drink ALL of her bedtime “tea.”

What you need

  • Magnesium chloride flakes (yes an expensive purchase, but it will last you forever!)
  • distilled water
  • either a glass spray bottle or an eye dropper bottle
  • stainless steel pot
  • glass mason jar (sized to hold remaining oil)

All you need to do is measure equal amounts of water and magnesium flakes into a pot and heat on quite low until they are dissolved completely. Stir it occasionally to help it along. Let it cool and put into well labeled and dated bottles. Distilled water is very important because it helps to keep your “oil” from going rancid and it shouldn’t cost you more than $2 for a huge bottle at the grocery store.

A spray bottle will probably be easier for application but I didn’t want to go and buy something just to make this so I used an old medicine dropper bottle and stored the rest in an old glass vitamin bottle. I didn’t want to make too much because I was not sure how long it would take us to go through it so I only used 1/2 cup of each.

As for application, you can put it anywhere you want. Remember…start with a small amount and work up. High doses can cause diarrhea and who wants that in the middle of the night! If you do get loose bowels, cut your dose back a bit until you don’t. That would be your ideal amount. I would recommend using it at bed time as it does help with a more restful sleep and I have read that for people with very sensitive skin, do not use right after a bath or shower and also try applying it only to lower back. There are also reports of some people having a tingling sensation for the first week or so of using it. It does go away.

20140109-145723.jpg

Window and Glass cleaner

For a really long time I looked for a good window spray/glass cleaner. I have been using this for over a year now and will never buy premade stuff again. I found one and for the life of me cannot find where I got it from. I apologize to whomever posted this recipe. I wrote it down at the time on an index card, never to find the website again. Story of my life…I always find amazing trinkets on the web and then I am distracted by life and don’t save the link.

Ah well…

Window washing spray/Glass cleaner

Good spray bottle(like an old glass cleaner one)
1/4 cup white vinegar
1/4 cup rubbing alcohol
1 T cornstarch
2 cups warm water

All you do is fill the bottle with the ingredients and shake. You must remember to shake it good each time you need to use the cleaner because the cornstarch settles to the bottom. This is the first homemade version that doesn’t streak. I use paper towels to wipe it off with but if you have old newsprint, use that. It leaves it much shinier. Now… you will need to do a good bit of rubbing to make it streak free but it is worth it. I find I don’t need to clearn my mirrors as much for some reason too.

***Please remember to label all bottles clearly and keep out of reach of children***

20140108-143417.jpg

Foaming Hand Soap

So. I love smells! I love Bath and Body Works soaps…problem is they all contain triclosan. Now, triclosan is a sneaky ingredient in almost all health and beauty supplies and it is suspected to interfere with hormones and harmful to fish and wildlife (yet we wash it down the drain every day not to mention applying it to our body!). Now…I do not want to take that chance so I make my own … maybe not as amazing smelling but they do their job. For many, many less pennies!

Foaming Hand Soap

old foaming hand soap bottles
dr. bronners liquid soap (any kind)
*OPT tea tree essential oil – to make antibacterial/viral soap

I literally once a month, go around the house and fill each bottle with about 2-3 TBSP of liquid soap, 4 drops of tea tree oil and then fill with tap water.
I shake it up really good and that is it.

Shampoo bars

So, it’s been a long while since I have posted anything and I feel like an update is needed in my shampoo or no-poo quest. I live in a city with very, very hard water and of course we cannot afford a water softener. Now, we have bought shower head filter and it should be noted that we do not have fluoride in our water, thank god! The shower filters have really helped but for those of us with hard water, making your shampoo system work isn’t easy. Especially us girls who have finicky longer hair.

Ok…so I’ll recap. For the last year or so I’ve experimented with baking soda wash and vinegar rinse, more natural actual shampoos(like dessert essence), edible shampoo solutions(egg washes, avocado, banana, oatmeal …etc), not washing with anything but a washcloth and water, washing with honey and herb water….the list really could go on! My poor hubby…he has put up with a lot and probably thinks I’m mildly crazy.

At one point I must have affected the betters half’s subconscious (or he was tired if me experimenting and smelling like vinegar!)because he stumbled onto a YouTube link that a girl was reviewing shampoo bars from chagrin valley. He made me watch it and I was intrigued. I researched their company, products and methods and was impressed with what I saw. Then I looked into the cost of shipping to Canada…yikes! I figured it was with it if I bought enough so I ordered about 10 sample bars and 3 big ones.

Once they arrived I was eager to try them! At first even my hair took some time to adapt to the bars. It seemed to leave a film on my hair. After traveling with the bars all over I’ve come to the conclusion that it is mostly our water. It’s terribly minerally and drying. The other factor is hormones. My husband doesn’t seem to notice as much as me because his hair is so short. Although what he has noticed is that his thinking hair isn’t thinning and is much darker now. It also is more manageable. He is using a bar recommended for those with hair loss to stimulate the scalp. I have tried many of the bars. I will lay out my evaluations on my own hair at the end. However, on my three year old, who does not have the hormones that I do, and every bar makes her hair look beautiful and shiny and soft. She also can get away with only washing one day a week. Me, I need at least two. If I were not working at home I’d probably have to add another wash in there to adhere to conventional “beauty” standards…day 4 hairs gets a bit unruly! I have gone 4-6 days when traveling to a place with soft water. Im always sad when I get home and go back to my hard water.

So…long rambling post, I know…here are my conclusions.

**post not complete** … I will update…I promise! Problem is, when washing your hair only two times a week….its hard to get all the results.

Update on vitamin potocol

So, with help from some very experienced, amazing fellow BP’ers I have devised a new vitamin regimen for myself that focuses on adressing minor adrenal fatigue and general adrenal health. I am going to stick with this for about 3-4 months and see how I feel. I want to really thank one individual and if you want to know more about his thinking and process, not to mentions actual knowledge behind it…please follow this link and help to support him. http://www.indiegogo.com/projects/ultimate-digestive-health-book?browse_v=new&show_todos=true

On to the new routine:

AM with BP coffee and an egg or two:

  • Thorne B5 complex
  • B12/Folate
  • d3 (5000mg every other day)
  • vitA (at the moment finishing btl of betacarotine but switching to fermented CLO)
  • Ester C (NON GMO) 2000mg
  • Glutathione, cycled on and off every week or two
  • Calcium D Glucarate 1000mg

Lunch

  • zinc citrate 30mg
  • krill oil
  • two drops iodine…specifically this detoxadine kind (will increase this but need to look into how and how much if needed)
  • selenium

Bed

  • magnesium glycinate 400mg
  • Potassium citrate 200mg
  • Ester C (NON GMO) 2000mg
  • relora plus(for adrenal health)

Along with this I am making sure to eat good carbs with supper and occasionally lunch, keep up my good fats and protein. Maybe about 25/25/50 for calories from carbs/protein/fats. I am also taking 1/8 tsp salt in the am upon waking.

Following our children’s lead

I have come to believe that if we just follow our children’s lead, we would all be much healthier and happier. Let me explain…see children have no filter on what they say or do. They purely act on instinct for which is usually right. So many things that children do are the ways we have forgotten or have been conditioned out of us. Just watch kids play. Their movements are some of the best exercises you can do. My daughter who is only three likes to try and carry our kettle-bells around the house (15/30 lbs, never mind trying to lift a heavy game off a shelf that is far over her head. Try imitating and playing like a 2-3 year old for an hour…you’ll be exhausted from all the crawling and acting like an animal, jumping, dancing , jumping off of things, running in circles and doing random yoga moves as you color laying on the floor. If they have their way kids are usually is running around barefoot, even outside.

Then comes food. Kids eat when they are hungry. They will always let you know when they are hungry, believe me. We do not need to fit our kids into a schedule for eating. Kids, if not exposed to a lot of sugary juices as a small child(1yr) by the time they are 2-3 usually choose not to drink them. They treat them like a treat. My daughter prefers water, and we lead by example. No matter what kind of lifestyle your family follows, a few things are clear to me. Kids, by choice, will always crave fats and good carbs(sweet potato, rice). Recently over the Easter holidays I sat at the table with the extended family for dessert and while my daughter, who eats a ton of good fats on a regular basis, devoured frozen banana ice cream with a spoonful of nutella for dessert. Her younger cousin who doesn’t consume probably as much, sat at the table, pushed away his dessert and pointed to the butter dish. Since he was sitting on my husbands knee, he allowed the little fellow to eat spoonful after spoonful of straight, salted butter. We had to actually stop him from eating over a 1/4 cup of butter. But that just shows you that we need fats for growing and brain function. My daughter has been cooking with me since she was 6 months old and always has reached for the butter. A friend texted me the other day, because she know ‘my butter thing’ and told me her three year old boy was helping to bake and grabbed the butter. When the mom asked him to wipe his hands so the butter wouldn’t get everywhere, he said “mmm…greasy butter. Butter makes me feel good!” Need I say more!

Kids unlearn their good habits from us. We use food as rewards (I do too, which I know I shouldn’t), we passively teach breakfast foods are generally sugar and carbs, we think kids should be bundled up when its chilly, and heaven forbid we put socks and shoes on them to go outside in the yard to play and get dirty. Being exposed to chilly and even freaking cold weather has its advantages(for a short duration). Kinda like if you wear your winter coat in the house for an hour, when you go outside you are still going to be cold because your body has become used to the temperature. It isn’t healthy to over bundle. Kids and teens rebel against us and undress as soon as they know we are out of sight. They hate being too warm, let alone have movements restricted. Children are in constant motion and their metabolism is so high they are always warm. Socks and shoes outside, give me a break! Most kids hate it! I hate it…well I do like my flip flops, but I’d rather go barefoot in the yard and on the beach. Anyone that knows me, knows I would wear my flip flops all year round and am 95% of the time barefoot at home. Being barefoot and grounded to the earth may have some advantages. Grounding mats and the theory behind them are a fringe idea, but one that I have fully accepted.

Anyways…just some food for thought.

Things to make you think

I have been compiling loads of information and the more I come across the more disturbed I am. I just wish I had a solution other than to blog about it. I was going to write a blog post for each article with my thoughts and opinions but I was getting to angry with what I was finding so other than the Monsanto post I blogged about this am, which deserved it’s own post, here are some very informative and eye opening articles. This should keep you reading for a while!!

Aspartame in Milk

Pharmaceutical companies

The toxins in meat

Podcast about raising Paleo/Bulletproof babies

Stop ‘shoulding’ yourself

great sugar addiction photo from Paleohacks.com

Egg standards…british/USA

fluorecent lights

Oil cleansing method

Washing your face with oil sounds a bit kookie…but it really works! It works better than most make-up removers and it helps to remove all those blackheads and whiteheads you can never seem to get rid of.

Basically it is what it sounds like. Washing using oil. The method is very relaxing (as long as you don’t have a child screaming about what pajamas to wear to bed in the background). Knowing that oil dissolves oil is very important in this process. Basically, you are using good oil to dissolve and wipe away all the dirty oil from your face, then replenish with more oil. No chemical involved at all to strip your face and make it feel tight. On that note, your face may feel tight if you have hard water or high chlorine in your water. I use our shower head filter to run the water to wash my face for better results, or you could boil water…but that takes time!

So, you need only a few things. Castor oil, a moisturizing oil, a facecloth and a hand towel.

Good oils for all skin types include:

  • sweet almond
  • jojoba
  • grapeseed
  • olive
  • argan (expensive)
  • sunflower seed

Good oils for other skin types are:

  • avocado – dry or aging
  • apricot kernal- dry aging

A few things to note. Castor oil can be very drying so make small batches to start in case you need to change your oil ratios. Also, remember that the time of year and your climate may also dictate you needs.

There are many basic ratios you can follow, the important thing to note is all of them have normal skin with a 1:1 ratio.

Oily skin – 2/3 castor oil, 1/3 carrier oil (2 tsp castor, 1 tsp carrier)

Normal skin – equal amounts of oils

Dry skin – 1/3 castor oil, 2/3 carrier oil

The “how to” part.

  1. Premix your oils in something (I use the original sweet almond oil container). Turn on your water to very warm. Warm your facecloth under the tap until needed.
  2. Rinse your face with warm water then use about a quarter sized amount of oil and gently massage it all over face. Work it into the blackheads and all the little areas. Massage always in upwards circular motions to get it into the pores. Do this for about 2 minutes then let the oil sit for about 30 sec.
  3. Heat your wash cloth until almost too hot for your face. Lay the facecloth over your face, cover with hand towel and relax until it cools…about 30 seconds-2 minutes. Gently begin to wipe off the oil. Rinse your cloth, really well.
  4. Repeat step 3 one to two more times but wiping face with hand towel so you don’t rub with the oily cloth.
  5. OPTIONAL: If you need a bit of moisturizing you can dab a bit of your oil mixture on to the areas. Just be careful not to add too much or it wont absorb in or refer here for my face oil recipe

Coconut oil is not recommended for use on face for everyone…it does clog pores and may contribute to blackheads. I use coconut oil on my eyelids and under eyes. It is really great for wiping away mascara and eye make up before washing your face.

That’s basically it. It can take your face a week or so to adjust to the new way of washing…as in not over producing oils, like in your hair!

Thanks to crunchy betty and oil cleansing method for information.

Troubleshooting:

  • make sure you are steaming your face and cleaning the dirty oil off well.
  • try a different oil ratio
  • try a different oil
  • If just beginning the ocm, you could mix just small amounts in your hand to see what ratio was best for you


UPDATE

My new oil blend is 1/3 castor oil, 1/3 sweet almond oil and 1/3 avocado oil. It’s wonderful. Basically, just pour into a container and shake. Away you go!


20140123-214402.jpg

Homemade Toothpaste

So, toothpaste was the first thing that I actually made from scratch in my adventure into the uncommon! I made two batches one that I liked and one with more sweetener and peppermint that my husband was supposed to like more! Alas, he didn’t so he kept on with his crunchy, clay based toothpaste. He said my version didn’t make his mouth feel fresh…I don’t know what he is talking about. I think that he just didn’t want to brush his teeth with oil.

In my journey and research, the reason I decided to make my own paste is because of one ingredient…well two. One is triclocan. We have all heard that it is not a good thing for our bodies and like most of our foaming hand soap from my favorite bath and body place, everything has triclocan in it! Why toothpaste? I think because of the anti-gingivitis effect it has. However its safety is currently under review both by the FDA and Health Canada. It is easier to find toothpaste without it. Glycerin, however, is in all regular toothpaste and almost all crunchy, green versions too! We did find one for my hubby that isn’t and he loves it. So, why is glycerin so bad? Well, the problem is that it will coat your teeth and prevent saliva from interacting with your teeth like it is supposed to. During sleep, our bodies are supposed to heal and correct damage done during the day. Since our teeth are coated with glycerin, our body cannot re-mineralize or re-enamel our teeth. Yes…our body can actually re-enamel our teeth if there is no coating. The trick is that it takes about 20-30 brushes to get rid of all the glycerin buildup on our teeth. So, make sure that you are brushing well and flossing. It is very important to floss.

So, here is the first recipe, adapted from here.

  • 8 tbsp non-aluminum baking soda
  • 4 tbsp organic coconut oil (warm it to make it liquid)
  • 10 tsp xylitol  (just put in coffee grinder to powder the crystals)
  • 2 tsp peppermint oil …baking kind
  • jar

Mix it all up and store it in the bathroom. I have a little ice cream spoon I keep with it to scoop. This is a very abrasive toothpaste that will last a very long time. I have used it for 5 months and we are not even half way through it! I would suggest halving the recipe to try it out.  Now the version for my hubby…which I actually like better now, has more peppermint oil and more sweetener. Basically, do those two to taste. I am also thinking of changing the recipe eventually for my daughter to use. Right now she has an amazing toothpaste with xylitol and I am not sure I can compete with strawberry banana flavour at the moment!

My new recipe will be:

  • 2-3 tbsp coconut oil
  • 1-2 tbsp xylitol, again make into powder
  • oil (be it peppermint, or other flavor for the little one.)

This one will be not so abrasive to the teeth, which will be good now that all the glycerin is off them. It will also be better for kids and the amounts vary depending on how sweet you want it. When I need my teeth to feel extra clean and whiten them, I will go back to the baking soda one…usually following a hydrogen peroxide rinse.

For the hydrogen peroxide rinse…you shouldn’t be doing this all the time…but it will whiten teeth and help remove canker sores. I use about 1 tbsp worth and swish for 20 seconds. Make sure not to swallow it…obviously! Then rinse out your mouth well with water, a few times. Continue on to brush as normal. I like to do the rinse first because it may work great, but sure doesn’t taste great. The toothpaste helps to get the taste out of your mouth!